


GitHub Actions 101: Creating Your First Workflow
Beginner Series to Automating your Workflow with GitHub Actions! Part 1: Introduction + Creating 1st Workflow


As technology constantly evolves, developers are seeking new ways to have more efficient development workflows. GitHub Actions allows developers to automate, customize, and execute their software development workflows from the repository itself. Hence, it is easy to integrate CI/CD, perform tests and customize any workflow using GitHub Actions.
In this series, let's walk through everything you need to know about GitHub Actions, from the basics to creating your own customized workflow.
At the end of the series, you will be able to:
- Understand how GitHub Action works
- Create your first action
- Create your first workflow
- More about actions and workflows
- Develop a basic CI/CD workflow
Prerequisites
Before we get started, these following prerequisites are recommended to follow along:
- Basic understanding of GitHub (create repo, push/pull/commit, pull requests, etc.)
- Basic knowledge of YAML
- Code editor like Visual Studio Code
Intro: How GitHub Actions Work
As mentioned earlier in the first paragraph, GitHub Actions allows automation of your software development workflows.
This is accomplished by running event-driven commands that are triggered to execute after a specified event has happened (i.e. a pull request, a commit, etc.).
Here are some components of GitHub Actions that you should know about.
1. Workflow
GitHub workflows are written in YAML. The workflow refers to the .yml(YAML) file you will create in your repository to define the specific automation procedures, instructions and actions you want to run after an event is triggered or scheduled.
It is typically used to build, test and deploy your projects on GitHub. Also, it is usually stored in your .github/workflows/ directory.
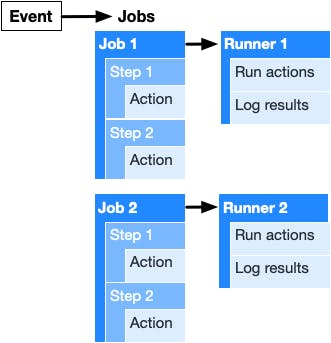
2. Runners
The procedures defined in the workflow require an environment where they can be executed. Runners are servers that allows these steps to be executed in a virtual environment. It can be Github-hosted or self-hosted.
It cannot be locally hosted, as a runner has to always be listening for events to trigger the workflow.
3. Jobs
A workflow must have at least 1 job and can consist of multiple jobs that work together either sequentially or in parallel. Each job is a series of steps that runs under the same runner (virtual environment).
You can configure how jobs in a workflow interact with each other. For example, if one job fails, the next one will not run. By default, jobs in a workflow run in parallel.
4. Actions
Actions are the simplest unit of the entire workflow. They are essentially the commands that define the steps of each job. Then, the jobs define the workflow and finally, the runners will run the jobs to execute them.
Now that we have learned these essential components of GitHub Actions, let's try creating our first action!
Create your First Workflow
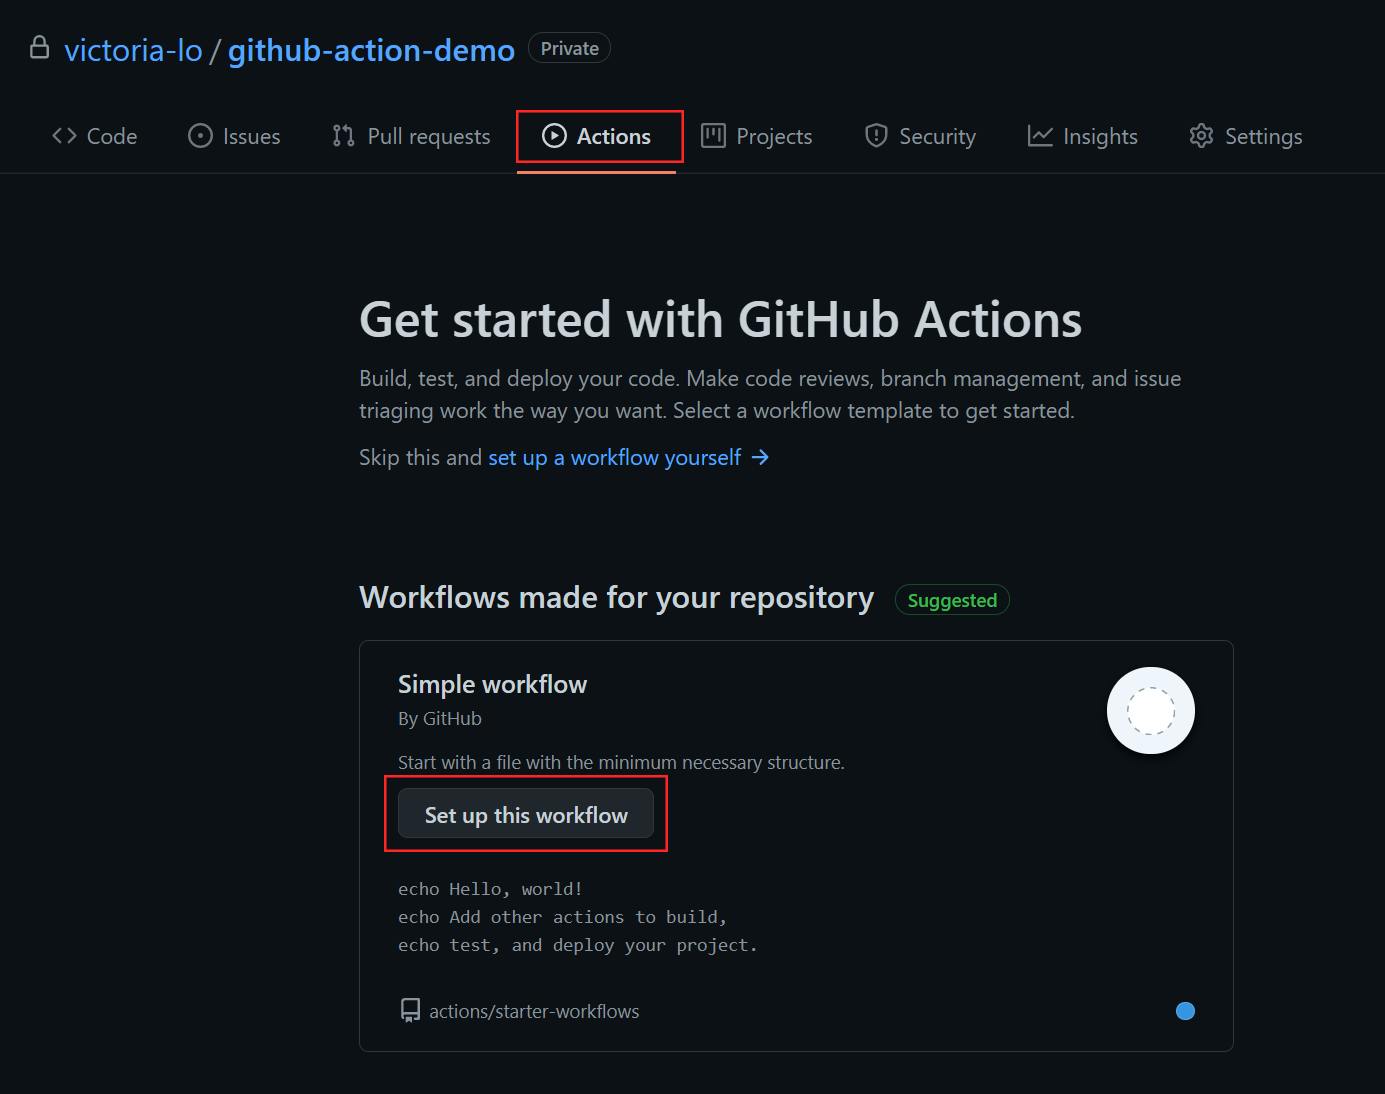
To create a workflow .yml file, navigate to the Actions tab in a GitHub repo then clicking the Set up this workflow button.
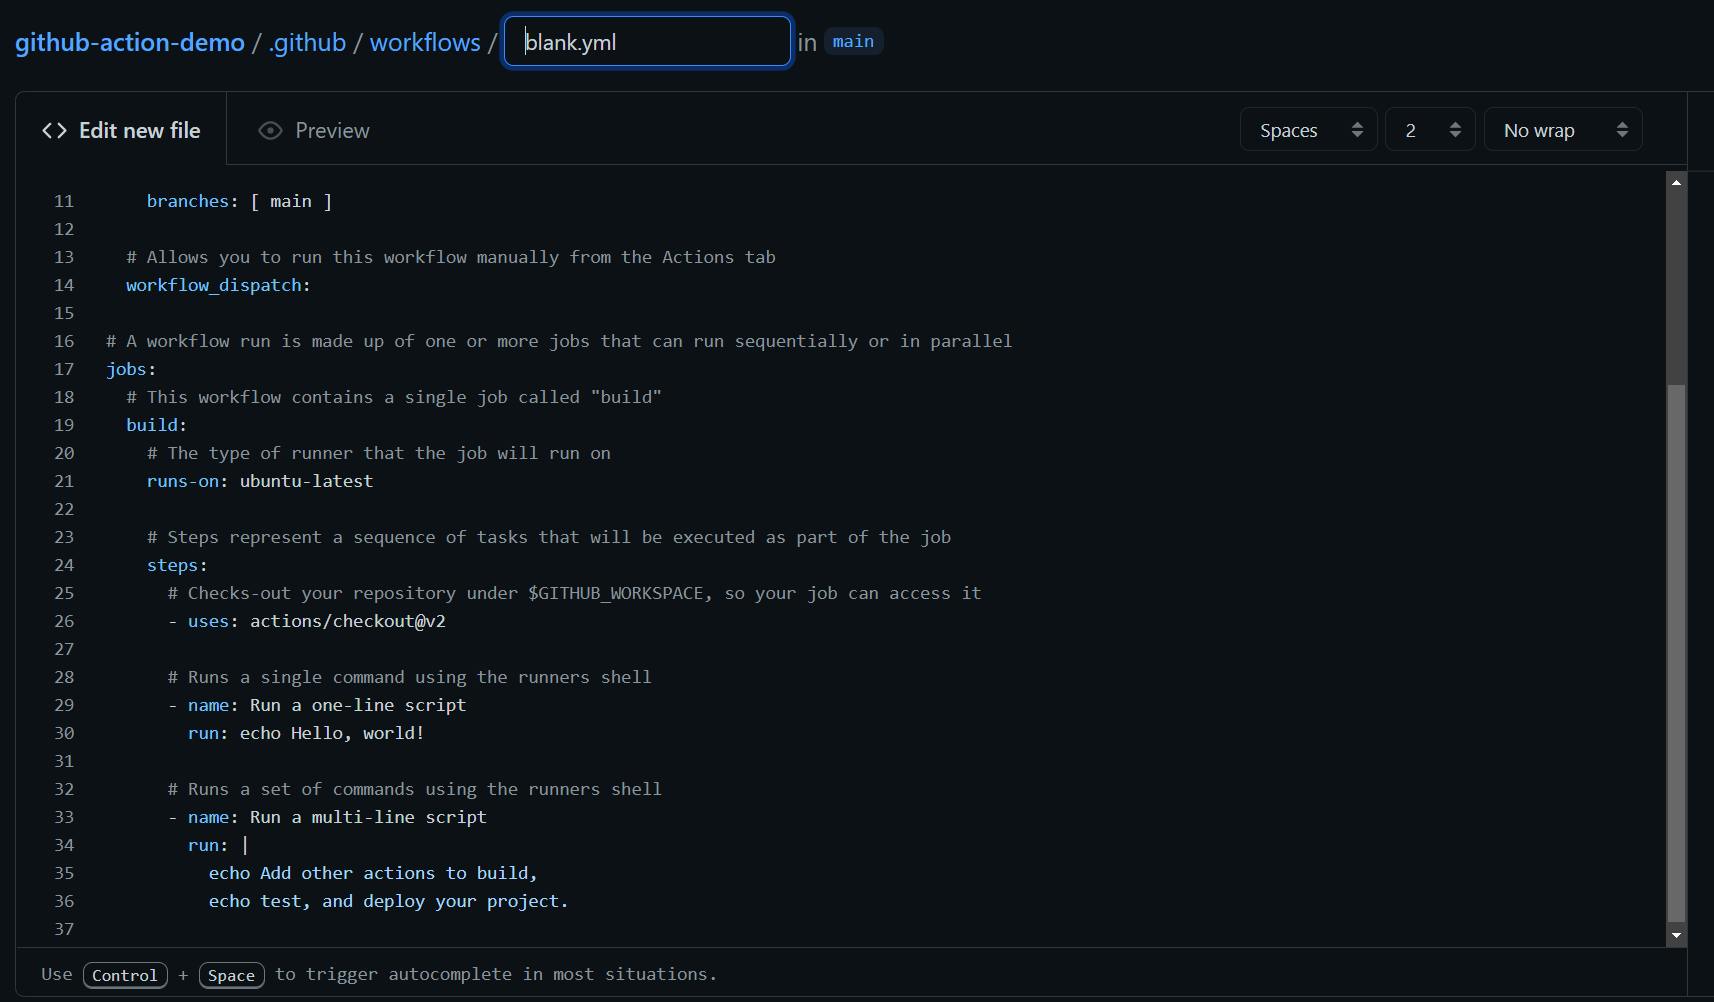
A new workflow file called blank.yml will be automatically generated under the .github/workflows directory. The image below shows an example of a typical workflow file.
Understanding the YAML
Let's take a closer look at our blank.yml file to understand how to write a workflow. Below is the YAML:
name: Test

on:
  # Triggers the workflow on push or pull request events but only for the main branch
  push:
    branches: [ main ]
  pull_request:
    branches: [ main ]

  # Allows running this workflow manually from the Actions tab
  workflow_dispatch:

jobs:
  # Contains a single job called "build"
  build:
    runs-on: ubuntu-latest
    steps:
      # Checks out repository under $GITHUB_WORKSPACE, so job can access it
      - uses: actions/checkout@v2

      - name: Run a one-line script
        run: echo Hello, world!

      - name: Run a multi-line script
        run: |
          echo Add other actions to build,
          echo test, and deploy your project.
Let's discuss a few important attributes to know from this YAML code above.
1. name
The first attribute in the workflow is name. This is an optional attribute used to identify the workflow. It is useful when you have multiple workflows under 1 repository. If this attribute is not supplied, it will simply default to its filename instead. In our example, I have named it 'Test'.
2. on
This is an important attribute that indicates when the workflow will be run. In our example, it will be triggered on the push and pull_request events, specifically on the main branch only. It can also be triggered manually via the Actions tab, as defined by the workflow_dispatch event.
Other events such as release or page_build, etc. Find out more at the Github Action Docs.
3. jobs
We have learned about jobs before, which are a series of steps that makes up a workflow. In this example, we only have 1 job called build. Note that each job must have a unique identifier that starts with a letter or underscore.
4. runs-on
Under each job, you must have a runs-on attribute. This attribute indicates the virtual environment the job is running on. In this example, our build job is running on the latest Ubuntu version (i.e. v20.04).
5. steps, uses, run
Steps are the individual tasks that makes up a job. Under our steps attribute, we can see 3 actions. An optional name attribute can be used to identify each action.
The uses attribute indicates the location of the action for the job to run it. And so the first action, uses: actions/checkout@v2, checks out a copy of this repository for its job to access it.
The next action is a simple command that prints "Hello, world!" on the console using the run attribute. And the last one prints multi-line messages on the console.
Let's try committing this file and trigger these actions in the workflow via a push to the repository.
Trigger your First Workflow
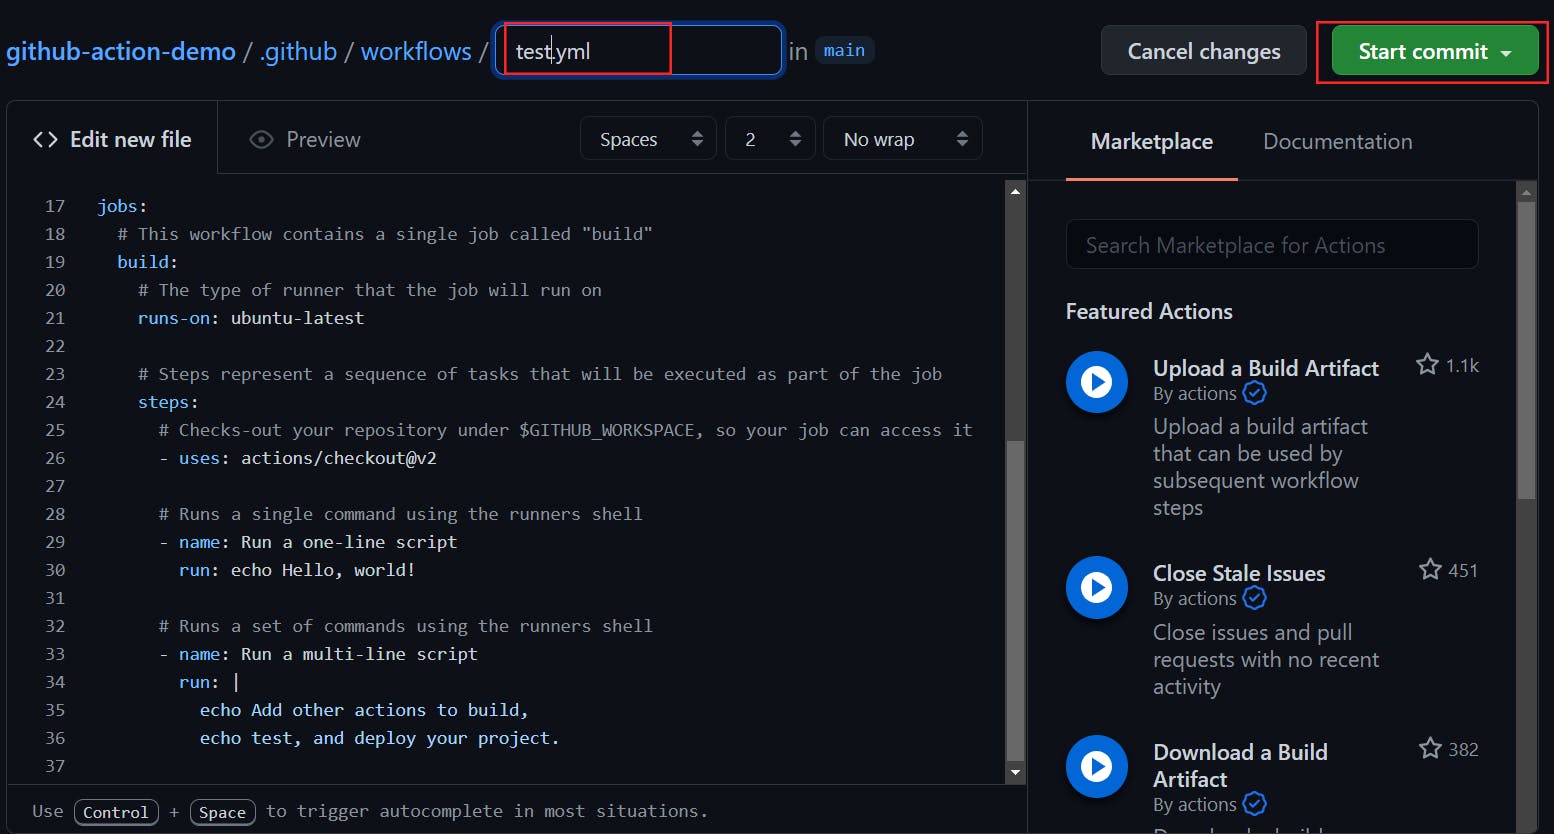
I renamed the file to test.yml and click Start Commit to push this generated workflow to the repository.
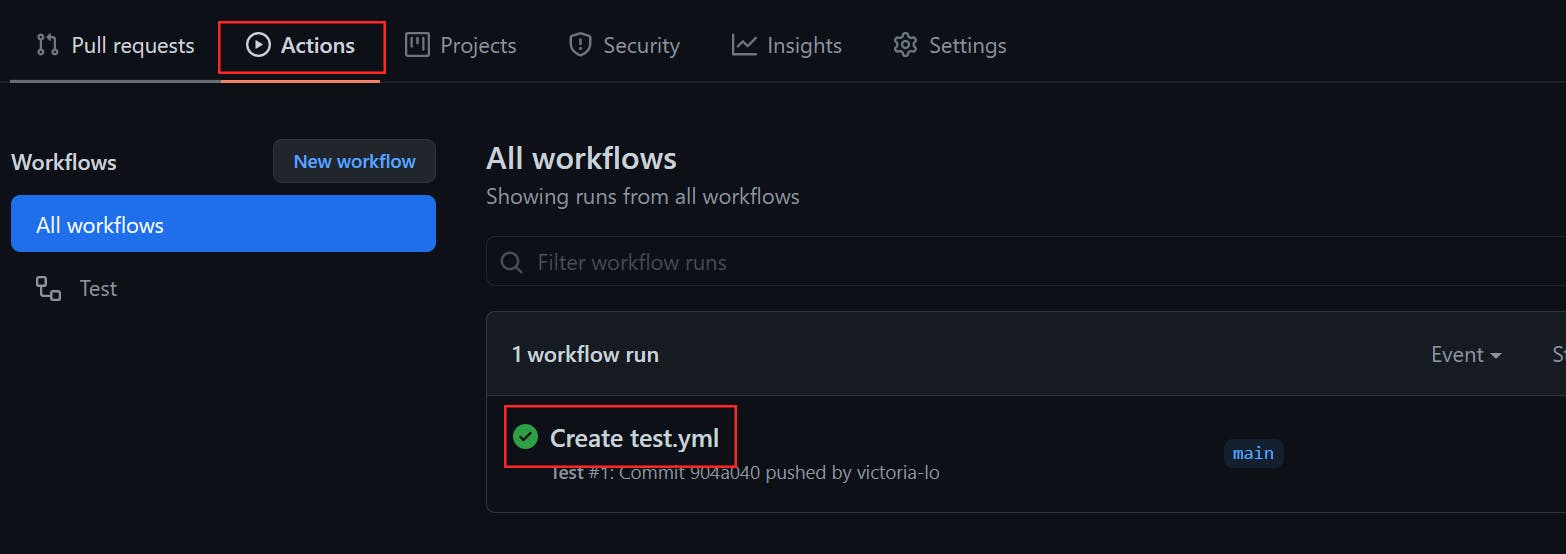
After committing the file, navigate back to the Actions tab. We will see that our workflow has successfully run, as shown by the green checkmark. Click on 'Create test.yml' to see the details of our workflow.
In the detailed view, we can see our "Hello, World!" and multi-line messages are being printed out correctly after the job runs.

To be Continued
Congratulations! We have created and run our very first workflow. Please visit this repo to review what we have built today.
Thanks for reading part 1! I hope it has given you a simple overview on how GitHub Actions work, what it does and how to get started with a simple workflow. But this workflow is not very useful, isn't it?
So read part 2, where I cover more about GitHub Actions there. Also, feel free to satiate your curiosity by reading the provided documentation in the References section below. If you have any questions, do leave a comment to ask. Cheers!