


GitHub Actions 101: Actions, Actions, Actions
Beginner Series to Automating your Workflow with GitHub Actions! Part 3: Actions from Marketplace, Actions from Repo and Custom Actions!


Hello and welcome to Part 3 of the GitHub Actions series. A series where we will walk through everything you need to know about GitHub Actions, from the basics to creating your own customized workflow.
In this previous part, we learned about Environment Variables and how they can be used in a workflow. A reader then asked about secrets so let me quickly follow-up the great question in this part, then move onto actions.
If you have missed Part 2, please read it here.
Secrets
Secrets are encrypted environment variables. It allows you to use sensitive information for your workflow. You can create secrets for a repository, organization or environment.
Once a secret is created and stored, it cannot be viewed or edited. To change a secret, you would need to delete it and create a new one with a new value.
To access a secret from your workflow, you can use them as input or as an environment variable. Just like environment variables, you can use the shell syntax or YAML syntax:
### YAML syntax
steps:
  - name: YAML syntax example
    with: # Set the secret as an input
      super_secret: ${{ secrets.mySecret }}
    env: # Or as an environment variable
      super_secret: ${{ secrets.mySecret }}

### Bash Shell syntax
env:
   super_secret: ${{ secrets.mySecret }}
run: |
      echo "$SUPER_SECRET"

### Power Shell syntax
env:
   super_secret: ${{ secrets.mySecret }}
run: |
      echo "$env:SUPER_SECRET"
Some things you should know about secrets:
- Up to 100 repository-level and 100 environment-level secrets can be stored
- For organization-level secrets, up to 1000 secrets can be stored
- Limited to 64KB in size
- A default secret called
GITHUB_TOKENis automatically set and can be used in a workflow. It is commonly used for actions that need authentication.
For more details, visit the documentation.
Action Arguments - with attribute
Now let's dive deep into Actions, as this blog's title promised. You can use with under steps to pass arguments to your actions. Depending on the input parameters of the action, you can pass key-value pairs as arguments like so:
jobs:
  my_job:
    steps:
      - name: My step
        uses: actions/example_action  # this is an example action
        with: # pass input parameters
          arg1 : value1
          arg2 : value2
Actions from Marketplace
Recall in Part 1 of this series, we learned about the uses attribute, which indicates the location of the action for the job to run it. Actions are the reusable unit of code that can be defined in the local repository of the workflow, a public repository or a published Docker image.
Additionally, actions can be published to the GitHub marketplace, and we can use them in our workflow via the uses attribute.
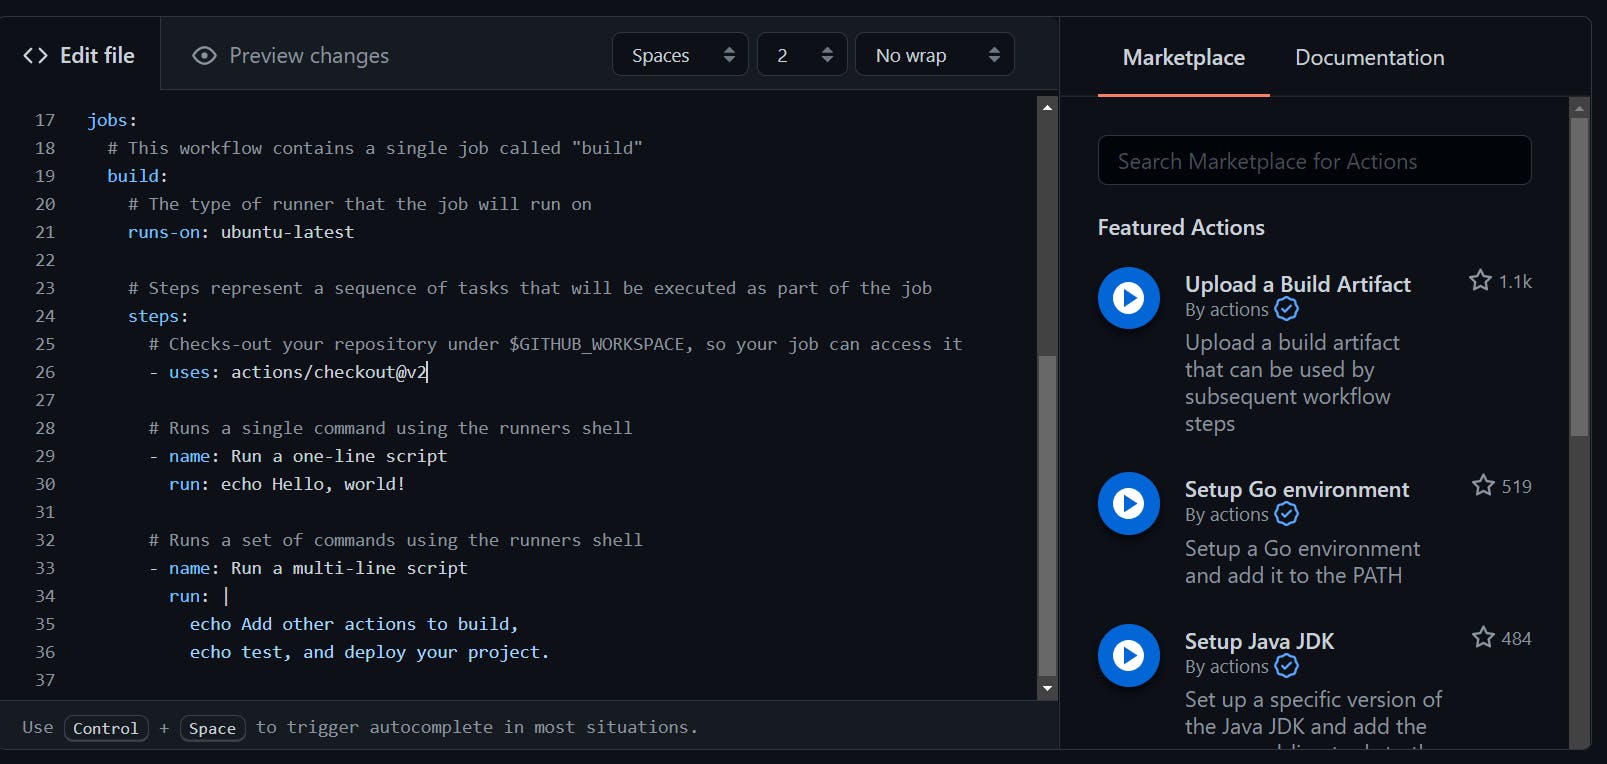
As shown in the image below, the marketplace will automatically show in the right panel as you edit your workflow. You can search for the action you wish to use from the marketplace via the search bar.
Actions from Repo
Besides using actions from the marketplace, we can use custom actions within our repository or a public repository too.
For local repo, where the action is in the same repo as the workflow, we can use it by specifying its path relative to the repository's root.
For example, if our workflow is at ./.github/workflows and our action is located at ./.github/action1, then we simply use this action in the uses attribute like so:
steps:
   - uses: ./.github/action1
For a public repo, we have to specify in the format: username/repo-name@branch-or-version-number.
Let's take a look at this pull request action in a public repo created by Andrew Musgrave.

We can use his action in our workflow like this:
steps:
      # format: username/repo-name@version-number
   - uses: andrewmusgrave/automatic-pull-request-review@0.0.5
Putting it Altogether
In this article, we have learned about:
- Secrets
- Action Arguments (
withattribute) - Using Actions from Marketplace
- Using Actions from local repo
- Using Actions from public repo
We can now write a simple and useful workflow like this:
name: Automatic pull request review

# trigger workflow on a PR
on: [pull_request]
jobs:
  #job identifier
  automate-pullrequest-review:
    runs-on: ubuntu-latest
    steps:
      - name: Approve pull request
        # condition to run the action
        if: github.actor == 'dependabot[bot]'

        # location of the action to run
        uses: andrewmusgrave/automatic-pull-request-review@0.0.5

        # action argument
        with:
          # GITHUB_TOKEN is an automatically generated secret for authentication
          repo-token: ${{ secrets.GITHUB_TOKEN }}
          # Approve the pull request automatically if it is by dependabot
          event: APPROVE
          # Comment of the review
          body: 'Thank you dependabot 🎊'
Isn't that amazing? This can be a useful workflow if you want to automate approving pull requests from dependabot. No need to manually maintain your old repositories anymore!
Limits
Before ending off this article, let's learn about the usage limits of Github Actions.
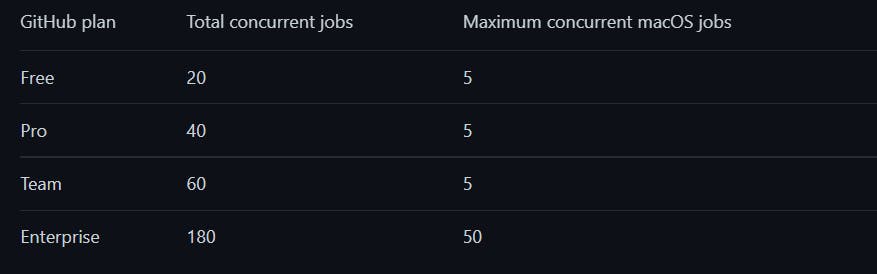
1. Workflow Concurrency
The number of concurrent jobs you can run under a free Github account is limited to 20 (see other plans' limits below) but 1 repo can have as many workflows as desired.
Note: You can trigger other workflows from 1 workflow
2. Runtime
Each job is limited to 6 hours runtime. If it fails to complete within this limit, it will be terminated.
3. API Requests
You can make up to 1000 API requests per hour. So be careful and know how many jobs in the workflow need to make API calls. If the limit is reached, and the job needs to make a request, it will fail.
More details of limits of usage, billing and administration can be found on this documentation.
To be Continued
There is still much more to learn about GitHub Actions. Let's stop here for today before it gets too overwhelming. Please visit this repo to review what we have built today.
Thanks for reading part 3! I hope it has been a helpful read. Please leave any questions or comments below. Don't forget to like and share the article if it helps you in any way. Feel free to read the provided documentation in the References section below.
In the next part, we shall move onto creating even more useful workflows, like developing a CI/CD workflow. Stay curious, cheers!